About deidrafix

Art Major

Constant Struggle

Image

Constant Struggle

Goal:
Create three slab constructed narrative pieces that are different sizes out of stoneware that are high fired. Each piece will be unique, using drawing skills to portray the concept.
Words:
Unique, passionate, strong
Concept:
The three pieces will show one image on one side of each. The images will be narrative, which will get the concept across. Each day I never know if I’m ever doing anything right, life itself can be hard and stressful; basically life pulling at you or showing that you’re torn will be the concept. I will carve hands reaching out and grabbing on one piece, in the middle the second piece will have an image of a girl running a way looking back, little does she know she will be running into the next piece which will be hands reaching out towards her.
Craftsmanship Form:
The three pieces will be strong structures standing upright, showing strength to go along with the images; you have to stay strong in this life because it will knock you down. The two pieces with the hands on them will be horizontal and will be the same shape, the piece with the girl on it will be vertical and placed in the middle of the two horizontal pieces.
Craftsmanship Surface:
I think that the pieces should be relatively smooth in some areas, but it should be texturized and carved into also getting the concept across. Not all things will go smoothly in life, you will run into bumps in the road.
Presentation:
The three pieces will glazed with high fire glazes in order to get a darker, earthy look. To present the pieces and get the concept across they must be laid out specifically. The horizontal piece with the hands reaching toward the girl will be on one side, the vertical piece in the middle showing the girl running into the hands on the other horizontal piece.

Series of Vases Inspired by a Master Artist

Image

Series of Vases Inspired by a Master Artist

Name: Serenity, Passion & Strength
Size: Under a Foot Tall
Material: Stoneware with Grog

The goal of the project was to Use stoneware to create a series of high fired vases, under a foot tall, that are influenced by an artist. The influence of these pieces was Jackson Pollock and his use of texture. This series was created using slab construction and were then high fired to get the earthy toned colors. Each vase is strong and stable. The added texture was made with clay added to the slabs, influenced by Jackson Pollock’s paintings. With high fire glazes it was hard to do drip painting on, so this is where the personal touch came in. Each piece was thought out and hand crafted very carefully.

Sculpture Project

Image

Sculpture Project

Name: Female Fertility
Size: 14’H 8’W 9’L
Material: Stoneware with Grog

This was one of the most challenging projects done by far. To start you must make a small maquette and use a grid system in order to blow the image up to be at least a foot tall. The human figure is challenging, especially when you must make it sculptural. You must have patients and an idea of what the human figure looks like. This figure is called female fertility due to her large breasts, like in Ancient sculpture, along with the dark low fire stain used. No fertility no human beings, draws attention of the human eye. This idea of the pose eyes are closed, looking down. I wanted people to have a sense of wonder…is she sad? What is she feeling? Her posture is good and shows strength but once you look at her face you see sadness or weakness, like she’s broken down. The Design and style of the piece you clearly see that the eye is drawn to the chest and then to the face, body is soft and smooth and the hair adds texture. Eye movement of the sculpture is immediately drawn to the body, but once you see the face that’s where the emotions come out of the sculpture. Bold and emotional are words that describe this piece.

Body Cast Mold

Image

Body Cast Mold

Name: Body Cast Molding
Material: Stoneware with Grog

laster was used to make the mold of this fist. Once the plaster mold was dry, clay was put inside of the mold with a layer of plastic in between to get the texture. I chose to do a fist to show strength and stability, the cracks and texture show the wear and tear some encounter with everyday life. Once the clay was taken out of the mold and fired, a series of wash glazes went onto the piece in order to get the color of flesh. One color would be added and wiped away, leaving a light color behind.

Vessel Inspired by Historical Form

Image

Vessel Inspired by Historical Form

Name: Traditional Pot
Material: Stoneware with Grog
Process: Pit Firing

This traditional pot was made using a pookie and coils to build it up. It took a lot of time in order to get the shape and smoothness perfect. Once the form and shaping of the pot was done, the clay was left to dry out a bit in order to apply the terra sigillata. Once the terra sig was applied, it was wiped down with plastic until the pot shined and was smooth. It was fired in the kiln and was then put into a pit fire, where the smoke is what creates the design. It is all a guessing game to what you will get when you remove it from the pit, but using materials such as salt and carbonate will allow the pot to turn pink in some areas.

Traditional Pinching

Image

Traditional Pinching

Name: Spirit Ball
Process: Raku Firing
Material: Stoneware with Grog

To make a spirit ball you must start with the traditional way of pinching the clay to make 2 halves of a sphere and molding them together to make it whole. Before you form the two pinched clay pieces together you may add small balls of clay separated by paper towel to make it a rattling spirit ball. Once you form them together you must form the ball by patting it easily and smoothing it softly, this takes some patients. You have you learn how to work with the clay and not over work it. Once the ball was decently dry, the design was made my simply taking little pieces of clay away, in which you had to be careful areas weren’t too thin. The spirit ball was fired in the kiln, added a special glaze, and raku fired. Raku firing is a technique that created the cracks within the glaze, you basically set your piece on fire which is very interesting! The design of the object is interesting in that it is not completely smooth.

Experimental Pinching

Image

Experimental Pinching

Name: Experimental Pinch
Material: Stoneware with Grog
Process: Bisk Fired, low fire glaze

The experimental pinch pots were easier to work with in that it didn’t require as much thinking; you can just work with the clay. However, you have to be careful that you don’t get the project too thick otherwise the piece will blow up, it must be 1/.2 to ¼ inches thick. These pieces were fired and glazed with three different colors of glass glaze. The thicker you put on the glaze, the darker it would be. A brush was used for this, but you could use a spray gun.

“So Which Came First”

Three Artists I have chosen that have inspired me include:

MSLK, a graphic design firm http://mslk.com/

Steve Bradley, uses trash he picks up to create installations http://userpages.umbc.edu/~sbradley/projects/index.html

Aurora Robson uses recycled plastic bottles http://aurorarobson.com/main.html

Article Bibliography:

http://sierraclub.typepad.com/greenlife/2009/06/plastic-bottle-ecoart-.html

http://inhabitat.com/aurora-robsons-ethereal-plastic-art-uses-up-to-20000-recycled-bottles/

So which comes first…I really didn’t know. After thought and consideration, the space had to come first before the artwork. The space had to be just right, and not many thoughts came to mind.  Since my artwork is going to stir up thoughts of pollution and recycling, due to the fact that I’m using all the bottles and cans I’ve consumed over the past month, I thought of an area that I knew would be beautiful if it was less polluted. When I first came to this area, I thought how peaceful and pretty! Who knew? Then that’s when I immediately thought it would be even more beautiful without the washed up bottles and trash. So why not add more trash to it? Awesome, that’s what I did. Although, I wanted to make this trash look somewhat presentable…this isn’t an easy process. I have never been real passionate about recycling or pollution and didn’t necessarily want this project to become all about that, but that was the route it went so I just went with it. The space itself can provide an explanation of the project just by the already polluted space.

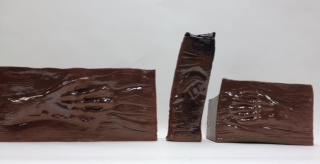
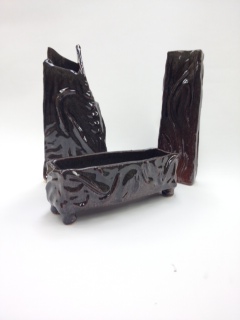
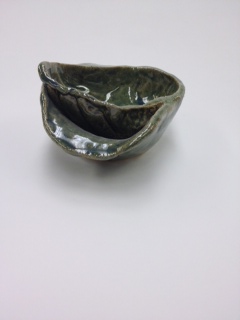
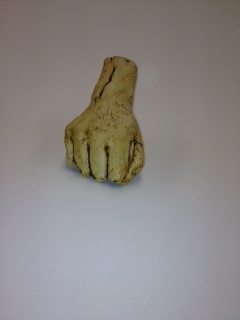
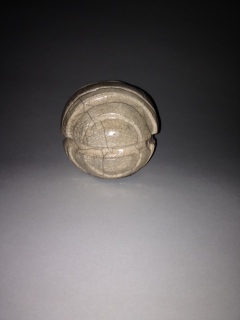
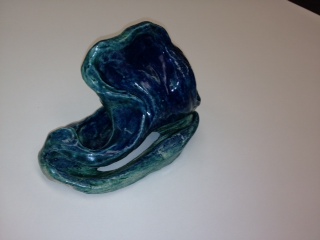
I chose to expand the 48 hours project to one month, to see how much liquid I actually consume, I only saved bottles and cans…and may have left out a few here and there so it’s a rough estimate of how many gallons I drank in a month. So now I have all these bags of bottles and cans laying around…now what. Hot glue! Make a mound…no…make flowers…no…melt them. I thought that if I was going to bring up recycling, why not melt the bottles down, that’ll create something interesting.

When looking at this project, I want it to be the viewer’s own interpretation…whether it is viewing all the empty bottles and cans as a need to recycle or trash, or do they view it as American consumerism?

Timeline:

April 15th I began saving my bottles, and decided I would save all my bottles until May 15th.   Monday May 6th, I counted all the bottles and cans I had saved. At the end of the day I had 14 pop cans, 10 tea bottles, and 44 water bottles. I began to play with melting the bottles down to see what they would do. Wednesday May 8th, I went to my site and took pictures and thought of what I was going to do from then on, that’s when I began gluing the bottles together. Throughout the week I melted more bottles and added them to my project. The more bottles I accumulated, I just glued them all together forming interesting shapes until the end of the 14th. Once I finished making all the pieces out of my used melted bottles and crinkled cans, I counted each one. The water bottle formation took about 19 bottles to make and the cans took about 15. The tea bottles were a little harder to make formations out of, so I just glued them together for a total of 15 bottles of tea. At the end of the month period, I had accumulated 15 bottles of tea, 76 bottles of water, 25 cans of diet pepsi, and 3 cans of an 8oz beverage, bringing my total to 1817.5oz or about 227 cups.  This makes a total of about 14 gallons of liquid that consumed in one month. Now this is a rough estimate, due to the fact that I only saved the bottles and cans that I  bought in bulk, 12 pack of pop, 35 pack of water… this doesn’t include drinks from a restaurant or out of a glass by any means.  There were 119 bottles and cans combined.

Conclusion…

So in a month, I was throwing away 119 bottles and cans that could clearly be recycled or used for something else, like an installation? I was generally taking my personal trash out about once a week due to all of the bottles and cans I was throwing away. For the month, I took my trash out once. This brings up a valid point that we can cut our nations waste down by simply recycling…which I have never done. Plastics are often recycled to make items such as clothes, carpet, containers, bottles, plastic lumber, films, grocery bags, molding materials, and lawn and garden products, to name a few. How much of our solid waste is plastic? The Environmental Protection Agency reports plastic made up 12% of the 254 million tons of waste generated in 2007. That’s more than 30 million tons of plastic in one year.  For every 1 ton of plastic that’s recycled, reports estimate that 7 yards of landfill space is saved.

Goals…

•             Create something questionable using a month supply of empty bottles

•             Find a location that brings up many questions and thoughts
Should we recycle? How much do we really consume?

•             Make it a “viewers interpretation”

  • Ask the question, is this trash…or artwork?

To be Assessed…

Were the goals accomplished? How?

What do you think of when looking at the artwork in the space?

How do you measure the success? Was it with the statistics,

or was it with the structures built in the space?